Friday, April 26, 2013

So ya thought ya might like to...be a DIY dude?

Basic DIY parts - Boards, resistors, capacitors, semiconductors and wires
Today I figured I'd do something a little different. Instead of bragging about another Fuzz I built and sharing my thoughts, I thought it would be a good point to stop for a minute and share some of the DIYer's daily routine. 

I've been an electronics geek since I was 9 and by the age of 11 I already had more than a few solder iron burns on my hand. I built mostly DIY kits and I was happy. around the age of 20 I started getting into electronic music and musical gadgets. Over the years I've built PAiA kits which came out excellent and have proven to be very useful and great sounding musical tools. It was only 3 years ago or so that I started really getting into guitar DIY pedals and amps. It all started with the Ruby amp by ROG and the Noisy Cricket from Beavis Audio. The amount of blogs, websites, tutorials and general info I found was so overwhelming that there was really no way back. At the time, I had a few commercial pedals like the TubeWorks Real Tube Overdrive, the VOX 847 Wah pedal and the fantastic Ibanez DD7 delay (which was the best birthday present I got from my wife after it was stolen during a gig). After a few fuzz and overdrive pedals I knew I would never buy another commercial grit pedal and the quest for the perfect fuzz circuit began. One thing I must admit is that I always wanted to build a spring reverb effect and have yet to achieve that. I did get myself this year (birthday again) the TC Hall of Fame reverb pedal which is an excellent addition to my ever growing rig.

So let's get down to business....If you're a noobe, a rookie, or just a dude who is trying to make a pedal in the real world, here's a short review of what you will need, and what you will need to know to get the job done. I wouldn't call myself a super experienced veteran, but I did build about 40 pedals and other audio gadgets over the past years and I made a hell of a progress over this period.

My 10 commandments for the DIY beginner:
  1. You don't need to be an electronic engineer to build a pedal, but you can't built anything right without having some basic understanding of electronics. You need to know what a resistor is what are capacitors, diodes, transistors, voltage, current, inputs, outputs, switches and potentiometers. All the rest can wait.
  2. You have to have soldering skills. Get a solder iron (or gun), watch some tutorials on YouTube and practice a little. It's not rocket science.
  3. Listen, learn, read-on....there are so many great websites with helpful information, use it! some of the best out there are:
  4. Decide what do you want to build, what sound do you want to achieve, don't build something you don't need. You don't want to spend money and time on something that you don't need or don't like. Listen to demos and watch videos of the pedals you are going to build. Almost any pedal you can think of has demo clips on the web. The gearmanndude YouTube channel has an incredible amount of pedal demos, so does Proguitarshop. Want some fantastic blogs except this one?
    • tagboardeffects.blogspot.com
    • revolutiondeux.blogspot.com
    • apocalypseaudio.blogspot.com
    • there are so many others too...
  5. Get all the information you need off the web BEFORE you buy any parts and BEFORE you do any soldering. Make sure you have the right schematic and a verified layout, compare versions and make a list of ALL the parts you need. It's really annoying finding out you need one more 2N5457 and having to wait for it to arrive by mail with your circuit sitting around almost finished. Great sites for buying parts:
  6. Get yourself a breadboard and make sure you are gonna build something that really works.
  7. It's harder to debug a non-working circuit than to build a new one. When you build your circuit make sure you are doing it right. Check and double check and triple check each point and don't move forward until you are sure you are OK. Go slowly and patiently. It will save you time.
  8. Nevertheless, there is always some probability for bugs. Bad parts, bad soldering, wrong schematics or just plain human mistakes. Don't loose it and be patient. Never give up on a circuit.
  9. Get yourself a simple digital multimeter and build an audio probe. The multimeter can test part values like resistance and capacitance but it is a super important tool for measuring contacts and voltage values. About the audio probe, we'll get to that later, but it's really something which helped me troubleshoot a few circuits. Any help you can get from articles by guys like R.G. Keen, Jack Orman, Doug Hammond, Runoffgroove and Mark Hammer can be extremely useful, but sometimes they  for more experienced DIYers. I built my audio probe according to the dubugging article:
  10. Last but not least..... Aesthetics is really something you should try to improve over time. It is great to buy good enclosures and to choose nice knobs, but what I really mean is keep your wiring neat and tidy. Shorter wires, better layouts, better enclosure and off-board wiring will make your pedal look better, and more important, it reduces noise, hum and can make your pedal sound better in the end result.
Solder gun, wire cutter, needle nose pliers and some
 solder wire. 
So....putting it down to practice. Say you made your mind on a great fuzz unit which you heard over on YouTube and you think that this pedal can do your tone some justice.
The audio clips on the Runoffgroove website or their older site home-wrecker are a great place to begin.
They give you everything from the clip and review to the schematic and the layout with a part list. The amount of schematics and layouts on the web is enormous and confusing. The websites I refer to on the lists above a great selection of verified schematics and layouts.

A breadboard setup with a bypass switch and i/o sockets
It is always recommended to start with a simple layout. Fuzz and booster pedals are a good place to start. It's good to order more parts than necessary for a specific pedal, over time you will see that you have many parts and can build a circuit from parts you have without having to order anything. For pedals which I wasn't sure about, like germanium fuzzes where the parts need tweaking, I found it very useful to get a breadboard and build a modular setup where I could use the breadboarded layout as a pedal with a switch and jacks so that I could really play with it and tweak it on the board.

Off board wiring parts...the enclosure is missing
Once you have the part list, don't forget to add the necessary parts for the off-board wiring and the enclosure. This means that for every circuit you see on the web you need to add:
  • 3PDT stomp switch
  • Enclosure (preferably metal)
  • Input and output sockets
  • 9V DC socket and/or a battery clip
  • Knobs
  • LED with a resistor
  • LED bezel
  • Stranded wire
Sometimes these must have parts are more expensive than the circuit itself.

Another thing that I found myself bashing my head about was 'what's the best true bypass switching layout?'
I found many layouts on the web and having tried more than a few I can safely say that I have found the right one for me. The layout below has true bypass switching with LED, DC 9V input with batter clip option. It also has input to ground connection when the pedal is bypassed. There are other options but this is what Analog mike of Analogguru and Zachary of ZVex are using. That's a very safe and sound layout.

My best stompbox True Bypass wiring scheme


An Audio Probe tester
The next thing is troubleshooting a bad circuit. You got everything hooked up, you think you got everything right, you plugged in your guitar, hit your favorite version of E with the pedal bypassed. Then you prayed and pressed the stomp switch but everything went dead. Then you panic....well...Don't panic! These things happen. Maybe you forgot something on the way. Maybe your transistors are busted, maybe you just didn't plug your DC power, but maybe it's something more complicated. 2 things you need: A multimeter and an audio probe. The multimeter can help you probe voltages and shorts anywhere on the circuit but a really simple way to find where your problem is is the audio probe. Just plug the jack to your amp or soundcard and the alligator clip to the circuit ground and then move from the output of the circuit backwards touching with the probe (the end of the cap) on the signal path until you find where the circuit becomes dead. One time I had a bad IC mounted and one time it was a bad solder point. It could be anything. Then the multimeter comes in to finish the job. Another thing is the grounds. Always make sure you got everything grounded right. It's easy to forget.

Drill protection with masking tape
The final stages of building the pedal are mostly aesthetic and artistic. I usually buy the Hammond style enclosures because they are strong and not too expensive. However, other metallic enclosures like chocolate boxes and mini lunchboxes, gum packages and other have proven to be equally nice, cheaper of-course, but naturally, not very sturdy.

When I want to drill the pots, switches and socket holes I learned that it's a shame if the die cast coating gets scratched during the drilling process.
The perfect enclosure

I started covering the enclosure with masking tape and did all the pencil measurements and drilling with the tape protection on. Once you are done drilling and cleaning, you take the tape off and the enclosure remains intact.

Trying to fit everything
In order to get your circuit sitting nicely in the enclosure and have all the off-board wiring all neat and tidy you will have to mount all the off-board parts on the enclosure and only then start wiring the thing up. This way you can measure lengths correctly without having excess wire running around in the housing. On longer wires you don't have to wire up wires on the shortest path but on a longer path so that the wires run inside near the edges of the enclosure and are not crossing diagonally inside. Sometimes there are so many wires that it simply looks a mess. Do the best you can. It's not easy making a pedal look good inside. Shorter wires and well organized wiring layout will help your pedal sound better and will help you troubleshoot problems if they occur in the future. Wires take up a lot of space. If it gets too crowded inside, your board can get messed up if you put pressure on it when you close the lid on the enclosure. Using shrink tubes where you think it is needed will prevent shorts. 

The finished product
So...that's it. Now that everything is working and you have chosen the right colors and played a bit with your pedal and you think you got yourself a keeper, you can commit to the artwork. After you paint the pedal there is no turning back, you won't be able to repaint it for another circuit (Unless you just paint VOL, TONE, GAIN).

For some time I've been looking for perfect colors to paint my enclosures, something which could be strong, opaque and comfortable for doing delicate brush work. What I have come up with is a set of window glass and ceramic paint. Lefranc & Bourgeois have some great ceramic paint, but the black color I found best was GlasArt used for vitrage painting. It says transparent but it is perfectly opaque for pedal painting. Buy a set of black, white, red, blue and yellow (maybe green too) and you can play around with a color palette to create some amazing tones. It is so much fun, if you enjoy creating new tones using various pedals for your guitar, you'll love painting. All the examples on this blog were done using these exact colors with Pure Sable brushes of various sizes. Acetone can be used to clean the brushes and to correct mistakes, but be very careful!!! Acetone can damage the gloss of the die cast coating so don't over do it.


Now go out and start working...be patient...put some thought to it and don't give up if the first one doesn't come out as good as you through it would.

In the end, it's the love you put into those pedals that gives you that satisfaction when you play your guitar and you know that sound is really yours. 

One last warning before I wrap this post up....if you are a guitarist or any sort of musician, don't get caught in the pedal making business to much. It's better to burn out than to fade away....ha ha ....what I mean is - It's always better to play than solder.

Rock On...crew members


Thursday, April 11, 2013

Fuzz Testosteron

The Mastotron Clone. Even the LED is pink
Well, here's a quick one. I was asked by a friend to build a Mastotron Fuzz clone which would be just like the real ZVEX but in a PINK enclosure. The main specification he was after was ultra bassy fuzziness. Reading a little about this beast I thought this would be a good choice. 

The schematic and layout seemed like a modified fuzz face with some added controls. He also wanted to do the artwork so I thought why not. 
I ordered the parts and got straight away to work. I really got more and more into vero boards lately so I gave it a go and made a vero layout from the tagboardeffects blog using a regular prefboard and using the leads of the parts as connecting lines to emulate the vero board layout. I really like this idea. 

This pedal is not a legendary one nor do I know of anyone who used it in the history pages of rock...but this thing can really roar. Actually I've never heard such a great bass fuzz before. This thing is the perfect fuzz for stoner rock and doom metal guitarists who need their sound to explode with fireworks. It has the square wave character of muffs and faces but it has this extra grit that makes you go 'uhhhh'. The controls have PUSH/RELAX (just a Pregain), FUZZ (of course), PW (pulse width, a.k.a. smoothness), TONE (very effective) and VOLUME (actually not a loud pedal even fully CW).


knobs, from the left: VOLUME TONE PW FUZZ PUSH/RELAX
I went to give the guy his pedal down at an underground bar where he played with his band and they hooked up the pedal right there in the middle of the song, like they were waiting for it. The pedal sounded great right away (except for having a bit of a low volume).

I used 2N3904 silicon transistors which are supposed to be great, but if he asks for more volume I might switch to higher gain ones or just add a booster stage before the volume knob.

Again, I don't know too much about this one but it's not for everyone. It's not a muff or a face, it's really something else, which is very typical of the ZVEX line of pedals. He is always tinkering to get more options and a wider palette of sounds from his designs. 

Definitely a worthwhile design for fans of Witchcraft, Witch, Windhand, Cosmolux, Hellbender, Blowback and other Stoner/Doom rock bands. Did I say that I even had the LED ordered in pink?

Here is the layout and the ZVEX description of the pedal.

I did a demo using guitar and bass for this one:

Saturday, March 9, 2013

A Palette of Tweeds - ROG's Azabache

Well, I'm really excited about posting today because I think one of my missions throughout this quest is over. A large part of my FuzzQuest has been devoted not to fuzz pedals but to amps or amp pedals which complement fuzz pedals. Over the past few years I have built the Thor (Marshall emulation), The English Channel (Vox) and the Professor Tweed (Fender), all Runoffgroove designs. I built other amp-pedals but I consider Vox, Marshall and Fender to be the most defining amps in fuzz history. Anyway they are all good pedals but there was something about the Tweed pedal which didn't sound right to me. It was good but I didn't get that Neil Young sound or Keith Richards sound which I really love. It was a good pedal for a fuzz kicking it, but as an overdrive it wasn't that rewarding.

So I started looking for more schematics and found that Wampler, BJFE and Catalinbread had some wicked stuff and I really wanted to give one of them a go. Just as I set out to, Runoffgroove came out with a very interesting design of a new Fender-like design which sounded good on paper. They called it Azabache. Surprising enough I also found a really nice guy who sent me the PCB for 10$ so I got the parts I needed and started to work. Usually I like building my own prefboards or tagboards but this time I thought "why not?"


The Azabache populated PCB 

The drilled enclosure almost ready

All sitting nice and comfy 
Ready for lock down

I love this combination of colors

I have played around with this pedal both in rehearsals and on stage and it always kicks ass. It is so versatile that it can go from muddy bluesy 50's style tweed to bright Black or Silver face country clean style. It's got warm overdrive that is to die for and with my telecaster it's just unbeatable. the SCOOP and BRIGHT switches are subtle but they do exactly as described and mixing with them on top of the TONE and GAIN knobs produce an endless amount of tones. I was so impressed by the range of colors it had that I named it Tweed Palette. Took me a while to decide on that name but...there it is.

This thing was not a kit. I just ordered the PCB and all the parts besides that were ordered separately. Just because someone asked I am mentioning this again:Q1 was 2N5457, Q2-4 were J201 and Q5 was 2N5088.

A mod from the RUnoffgroove team on DIY Stompboxes for reducing the trebleness of the pedal: Substitute the 47K resistor going to TONE 1 for a link (or a smaller value resistor).

I did some playing around with a tele and a cabinet simulator and sent it over the ROG guys with many thanks:


Now you probably want to know how it sounds with a fuzz. Well, with a silicon fuzz face like my Pink Face it sounds the best. Instant 60's fuzz. Did I say that half of my quest is over?

Anyway here is the ROG Azabache project and schematics. I would love to know how it stands next to the Catalinbread Formula No.5.


Saturday, January 19, 2013

Don't stomp me now - The Mojo Stomp porch box

The Mojo Stomp
Somewhat off the main path or my FuzzQuest, here's something a bit different. The never ending quest for a perfect fuzz tone is not my only goal in terms of tone and guitar sound. Another fetish of mine is Blues, and by Blues I mean hard, painful and soulful Blues with its roots somewhere around Mississippi delta. I love both acoustic and electric blues and as much harmonica as possible with a lot of howlin'. From Mississippi Fred McDowell, Blind Lemon Jefferson to Howlin' Wolf, Little Walter, John Lee Hooker and Muddy Waters. Even the "new" guys like Charlie Musselwhite, R.L. Burnside and Junior Kimbrough are fantastic and deliver super guts-out blues. When I play solo guitar with harmonica and I wail my soul out I always find myself stomping my foot hard against the floor, and most often I pray it was a wooden porch floor. Most of the time it's not.

So, I started searching the web for every possible porch-box-stomp-box solution and came up with a huge amount of material to work with. A lot of people around the word will sell you a wooden box with a Piezo transducer and some jiggling metals inside to get a nice foot stomping sound. Some of the nicest sounds I've hear, however, came from boxes where a small speaker was placed as the transducer to pickup the mechanical vibrations of the stomp.

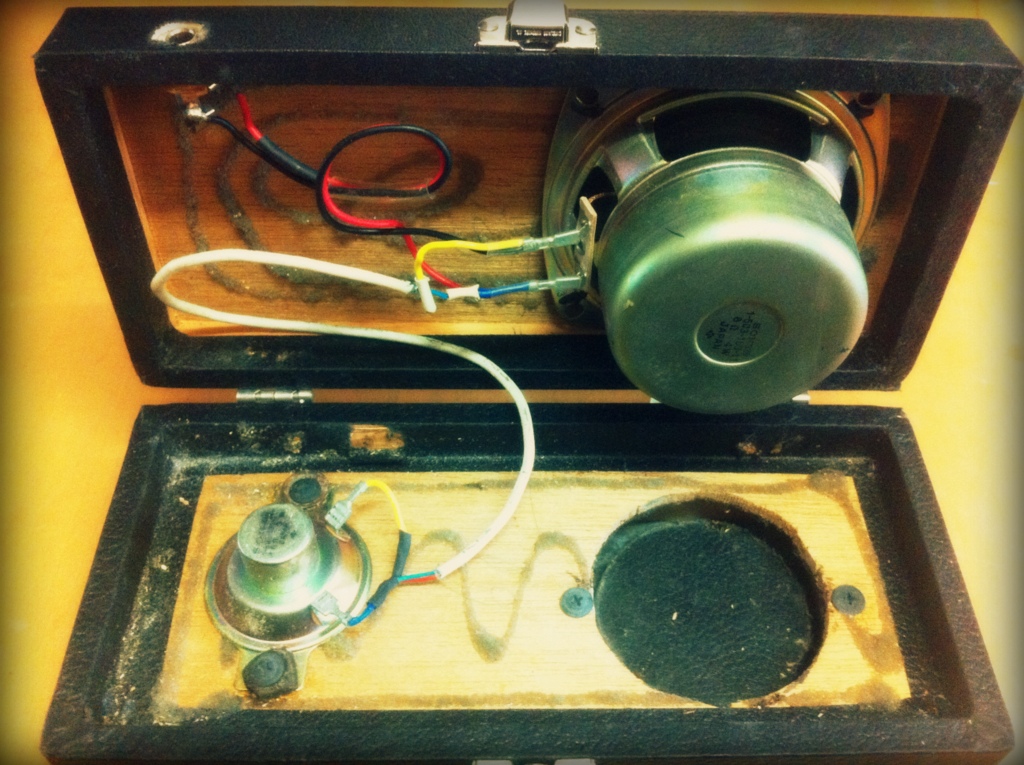
I found a really nice 2-way Sony speaker and a good wooden box (old optical equipment was traditionally sold in very good wooden boxes). The woofer had a good low bottom while the twitter had nice punch, so I decided to use both of them placing the two speakers in the box. I cut a big hole so the the box would close and the Alnico magnet of the woofer would stick out of the box and I covered it with some more wood and rubber. I hooked up the two speakers in parallel and took the two lines and connected them to a mono Neutrik 1/4" input jack and that was it.

The Mojo Stomp - gut shot - two speakers, one jack, one box

There are so many ways you can use this box. playing with your foot or hands, stomping, tapping or knocking. Different areas on the board give you various tones, closer to the woofer you get more bass, closer to the twitter you get more treble and edge. All this makes this box a nice electro-acoustic bass drum. The added value here comes from the fact that you can turn the box upside down and get even more tonal options because now you're hitting the speaker membranes from the opposite side. One last gimmick is the tilted position of the box due to the magnet's size, sticking out of the box. This means you can put your foot on the pedal and do a "wah-wah" kind of movement and get two bass-snare sounds, one from your heel knocking the bottom end against the floor and one from your foot tapping the upper side of the box.

Very dynamic and playable !

The Mojo Stomp - the tilted position
To anyone who's interested in these kinds of boxes I strongly suggest - Build your own. It's too dams simple and there are too many boxes out there that will be just OK and not exactly what you are after. As always, it's your quest to get your sound!

Some well respected stompbox manufacturers are Mojohound, Pratley, Ellis, musiXtools, TinoStomp and Peterman.

Stomp away and howl....if you want audio or video clips, just comment and I'll abide.

Saturday, December 22, 2012

Driving Down Da Bass

The Caribass - ROG Flipster
This time we are off and away from the world of guitar and into the bass we dive deep.

Runoffgroove's (ROG) Flipster was designed to emulate the tone and drive of the famous Ampeg Portaflex SB-12 bass amp. This amp was the little brother in a series of tube amps designed in the mid 60's. The amp had a 12'' Jenson speaker cabinet and was probably used on many recordings from 1965 and on through the 70's. Mo-Town Bass sound was known for using Ampeg bass amps.

I don't know too much about bass amps but I do know that I like Ampeg bass amps. They are smooth and have a lot of bottom as well as edge. I particularly love controlling the character of a song using bass, whether it's deep dub style lo-pass or grungy-rock overdriven tone. When I play bass I sometimes like to switch quickly between styles and all that flexibility means I need a good pedal, capable of drive range from clean to hard drive with some equalizing options.

A 1965 Portaflex SB-12
Assuming ROG designs are always good, especially for emulating tube amps, and this one had 2 12AX7, 2 7868 and 1 5AR4 tubes. I built it and tried various FETs to get the gain I wanted. Funny thing, I made a nice error hooking up the the TONE knobs and got 2 modes for the tone-stack. ROCK mode for a more edgy-punchy curve and a DUB mode with less treble and more lows.

I played with the pedal on more than a few occasions and I still use it more for live than in the studio. It gives you the ability to drive your bass without touching the amp and it's not like an overdrive pedal which cuts the lows. You can maintain your lows and still bark and bite. For really hard bass distortion there is nothing better then the Pro-co Rat or any version of it like my Bat shown here on a previous post.

There is a new Portaflex SB-12 version now called "Ginger" which is supposed to be better. I think I know what they are talking about, The Flipster was good, but not so much as an emulation of the Ampeg amp. I did have problems getting low gain clean tones with the Flipster but it was good for what I needed.

Because I got an interesting paint job on the wooden enclosure which had some Carribean touch to it I decided to call the pedal Caribass. With my Music-Man Sting Ray replica bass I can get some great tones with almost any style.

I am definitely getting ready to upgrade the Flipster to the Ginger. Stay tuned as it is right around the corner.

If you want gut shots or audio clips just comment and I'll add them. As always, schematic is available here. More info from Runoffgroove can be found here.


Friday, November 30, 2012

Bending your Tone for Page

The Led Bender mkII
The UK fuzz mania began in 1965 probably after the Rolling Stones recorded the 3 fuzz notes that changed the history of rock'n roll: the opening notes for their hit "Satisfaction". First recorded on Brian Jones' Harmonica in Chicago and 2 days later by Richards using a Maestro Fuzz Tone, the opening notes were meant to be replaced with a horn section later on, but luckily producer Andrew Oldham decided to keep it as it was. The song was an immediate hit across both sides of the Atlantic and fuzz was the talk of the day. Guitar legend Vic Flick, the man begind the James Bond Theme, brought the American Fuzz-tone (FZ-1) to the UK and asked electronics engineer Gary Stewart Hurst if he could modify the unit to increase the tone sustain. Hurst used a similar 3 transistors architecture and designed the first Tone Bender, referred today as the mkI. Within a year or so a plethora of fuzz pedals were issued by various brands like the Arbiter Fuzz Face and the Baldwin Burns Buzzaround. While the Fuzz Face became the most famous fuzz of them all, the Tone Bender was probably the highest selling unit ever due to the fact that it was issued under various brands like Sola Sound, Vox, Rotosound and Marshall. The MKI version was made famous by the Beatles (Rubber Soul), Mick Ronson (Ziggy's Spiders from Mars), Pete Townsend and Jeff Beck.

Jimmy Pages' Bender original receipt (left) and the Sola Sound reissue of the mkII (right)

Despite its legendary sound, the Tone Bender mkI's sound and design was not flawless. Circuit was sensitive to gain tolerances of the transistors and the sound was buzzier than some wanted. A new 2 transistor design was issued by Sola Sound and is referred to as mk1.5. This design could probably be the original 2 transistor design which Arbiter issued during 1966 as the Fuzz Face. The circuit was more stable, the sound was richer and saturation was not too heavy. The huge success of the Fuzz Face drove the competition further and Sola Sound made the leap to a 3 transistor architecture but this time it was a first amplification stage driving a Fuzz Face style 2 tranny stage with Germanium OC75 or OC81D were used on all 3. Different brands featured similar mkII design using various transistors, and they all were successful throughout the late 60's and 70's. When referring to legends like Jimmy Page and his tone on the Led Zeppelin I and II albums from 1969 the Tone Bender mkII is considered to be a major factor.

The Led Bender mkII
Even more variant and diverse than the Tone Bender mkII of the Fuzz Faces is the Tone Bender mkIII which was issued 1968 and sparked a whole different era of fuzz pedals which led to the birth of the Big Muff.

After building more then a few fuzz pedals I decided to get into the Tone Bender jungle. I realized that I really wanted the mkI and the mkII, but the mkI seemed tricky and risky so I took the mkII path. Now Germanium trannys are always expensive and I found some silicon versions which got good reviews so I decided to give it a go.

After many unsuccessful attempts on various schematics I found one which worked, sounded good and by replacing trannys I really managed to get that bendery tone I was aiming for: Raw, punchy and versatile. Once you go for the Whole Lotta Love riff with humbuckers or How Many More Times with a Tele, you'll know this is the one.

I started with the GGG NPN design modded by J. Orman and B. Trembley which is a good choice. You can find the schematic here, but I really wanted to have the extra Tone control so I went the Hot Silicon path  designed by Gus Smalley. The schematic is shown here. The two designs are quite alike and sound more or less the same depending on the transistors used. I took Mictester's and JD Sleep's advise of putting low gain sets and went to buy the 2N2369 parts instead of BC109C or 2N5088. I ended up using 2N2369 for Q1, 2N3904 for Q2, BC109C for Q3 and 2N2369 for Q4 for the TONE stage. I also liked the FAT switch which switches between low and high values of the input cap. Once I got that Jimmy Page sound I called it a day and painted the new Led Bender in a Zeppelin homage style.
Gut shot of the Led Bender. VR1 is a pot on the right side.
Might as well change it to a  board resistor.

I am sure this is not the end of my Tone Bender phase but it sure sounds great, I am getting a friend to lend me his Sola Sound reissue of the mkII professional and I'll compare the two. Meanwhile I play Good Times Bad Times using this little baby connected to the Runoffgroove Supro amp emulation pedal and with the right  reverb I can nail that super tone. A major milestone in my Fuzz quest.


Thursday, November 15, 2012

The Flying Rat


The 60's and early 70's were all about driving tube amps into overdrive heaven and on the way use fuzz and treble boosters to get the job done. Most Fuzz stompboxes were, in fact, so effective that you didn't really need the amps to be that heavily driven anymore, but they killed most of the guitar's tone and dynamics. They took over the sound (Fuzz faces and Big Muffs to name a few). 

As people got fed up with fuzzes and wanted back that dynamic distorted overdrive, Orange amde the first step and came out with their Overdrive amp in the mid 70's. That started the distortion race all over again. The idea of a stompbox giving you that distortion, which was so important for rock guitarists, yielded the next step in the second half of the 70's. In 1976 Amlyn Crowther designed the Hotcake which would become the first boutique overdrive (Sonic Youth, Pavement, Radiohead, Protishead and many other consider it their "secret weapon'). Japanese based Ibanez and Boss came out with the classic Tube Screamer and the OD-1 (DS-1 too), respectively, around 1978. In Kalamazoo, Michigan, two guys in a basement started selling custom ordered pedals under the Pro-Co name. Those were the first Rats. All the above brands produced pedals based around an operational amplifier and have some similarities in their designs. All three became classics and over the years got reissues, sequels and modified versions. 

I decided to build the Rat for 3 main reasons: a) It is a classic pedal and deserves FuzzQuest attention. b) Some of my favorite guitarists use it or have used it over the years. C) There is no real mojo in this circuit. the LM308 chip and clipping diodes are all pretty straightforward. No Germanium PNP or de-gooped old boxes with debates over them. The amount of schematics on the web is infinite and the mods are all given out. You can build the circuit with mods and it will sound just like the real thing. Even better. Guitarists who used this unit and made it famous were Thom Yorke, Thurston Moore, Stephen Malkmus, Bernard Butler, Marc Ribot, Bill Frisell, Frank Black, Jeff Beck, Andy Summers, Graham Coxon and Kurt Cobain, to name a few. If you told me only Thurston and Ribot were on this list, it would have been enough for me. This might have been the overdrive/distortion used by Ribot on Rain Dogs by Tom Waits. Imagine that!

The Multi Rat Schematic
So, I gathered about a dozen schematics I considered to be trustworthy. RG Keen and Jack Orman did some tremendous work given on the aron nelson archive and diystompboxes. You can download the schematic shown here, but Beavisaudio, GGGSabrotoneSoulSonic, Gaussmarkov and others, all have verified circuits readily available, just click the links.

I added the Ruetz mod to conttroll the highs and called it EDGE. Got an On/Off/On switch for choosing between the diodes, MOSFET clipping and clean boost and named it CHARACTER. DISTORTION  FILTER and VOLUME are similar to the original. Apart from that it's a vintage Rat clone.  The added mods give it a lot of "elevation" so I called it the BAT. Also I liked the Mokafix Bat VST emulation and adopted the name. It really is a mouse with wings.

So I got the circuit working and painted the enclosure. I really dig the sound which sounds pretty awesome especially with my English Channel emulation of the AC30. I completely understand why this became a classic unit. This is the distortion we grew up on listening to grunge, alternative and punk rock from the 80's and 90's. Great sound, versatile, easy to use. Humbuckers with an AC30 you get the British indie rock of Suede and Blur. Single Coils with Fender amps will give you Sonic Youth and Pavement flavors. Pretty Amazing. With the clean boost mod you can get great fuzzy overdrive and you can drive other pedals on the chain or drive your amp further. Super!  

As always, if you want audio demos you have to comment and ask for it. I hope to get some clips done for all my posts but it's gonna take a while since I am on a building mania and even posting on the FuzzQuest blog takes me forever.

Anyway, a very recommended build. Pretty easy and fun with a lot of options. With the Ruetz mod attenuating the highs and the clean Boost which is not so clean I got some wicked fuzz sounds. If you are wondering, you can be sure that a Tube Screamer clone is on the way. Naturally.
   

Saturday, November 10, 2012

The Pink Face

The Pink Face
Throughout the history of fuzz pedals, fuzz guitarists and psychedelic fuzzy solos, there is no fuzz which has received greater attention than the legendary Fuzz Face. Originally produced by Arbiter Electronics in England and appeared during 1966 the unit was an immediate success. Many of the greatest guitarists in rock history played their best solos and riffs through a Fuzz Face including Hendrix, Gilmour, Blackmore, Harrison, Townsend and many more. Nevertheless, the dependency of the Germanium transistors on temperature resulted in a lack of tone consistency and many players suffered on stage from this effect. To circumvent this issue Dallas Arbiter started issuing Silicon versions of the FF somewhere around 1969 replacing the NKT275 trannies with BC108. Silicon was the new hype at the time and it seemed that by 1970-71 everybody was switching to Silicon faces. Hendrix's Band of Gypsys, Gilmour on all PF albums and tours since 1971 including all of the solos on Meddle and Dark side of the Moon are probably the most documented examples. One of my favorite guitarists Michael Karoli (Can) also used Silicon Fuzz Faces to create his raw and untamed distortion throughout the history of Can, so this was enough to get me going. 

Both designs are pretty close with the Germs being mostly PNP and the Silis being NPN. Comparing the sound of the Germanium units with the Silicon ones it is often said that while the Germs sound raspy, warm and sweet, the Silicons are brighter, edgy and have more gain. Well....from my builds....this statement is....TRUE!

The original 1966 Arbiter Face - Germanium
On my Fuzz quest I really couldn't imagine the journey without understanding the differences between the two FF versions and there was no other way than building the two. After I finished the Germanium Fulltone version I started to drown with info on the Silicon versions: Fulltone, Analog Man, Dunlop, Runoffgroove, GGG you name it. I looked through dozens of schematics and breadboarded some of them. I even looked at the German Schaller Fuzz (FF variant) after reading that Michael Karoli (CAN) used one. Actually, the first fuzz I ever built was the Runoffgroove SiliFace II and I loved it for some months. That was what got me interested in fuzz pedals in the first place, My Fuzz quest started because one fuzz was not enough to get the range of buzz tones I was after.

The 1970 Dallas Arbiter Fuzz Face - Silicon
Due to the fact that the Fuzz Face design is tolerant to part values many versions have been issued over the years and the amount of Fuzz Face versions became quite vast (just like it happened with the Big Muffs or the Tube Screamers). The design is so simple that small part changes resulted in some sonical change. After all the entire unit incorporates 4 resistors, 3 caps, 2 transistors, 2 pots and 1 switch. That's it!


4 resistors, 3 capacitors, 2 transistors, 2 potentiometers
The sound I was aiming for was that of Gilmour playing the Time solo on the album version of the Dark Side. I started out with the GGG early 70's Boutique NPN Fuzz Face after my success with the GGG 60's version. I liked the PRE GAIN knob and the circuit seemed pretty good, but something was missing. I didn't box the circuit and it stayed on the shelf for some time. I built a few other Fuzz pedals and when I thought I understood more about what I wanted I revisited the circuit. This time I modified the circuit based on the Axis Face version by Phillip Bryant modified by Brett Robinson. 

Gilmour's early 70's rig

I did a lot of testing using Hi-Watt amp emulations, tweaked many of the parts in this little circuit, changed trannies and used several guitars. Surprisingly, I ended up using 2N2369 (hfe=70-90) for Q1 and BC109 for Q2 (hfe=200). The BC108C I had (hfe around 400-550) seemed to be too pumped up for my taste. I settled on a 50kA pot for the PRE GAIN and a 100kA for the VOLUME. 220n cap for the input and 30p cap on the bridge for lo-pass filtering. I replaced the CONTOUR pot with a 470R resistor and kept the 22uF Fuzz cap. I kept the reverse polarity protection and cut off the strange feedback diode bridge which didn't seem to affect the sound. Biasing Q2 I got 4.5V with resistance being about 3k3 so that's about 4k3 total Q2 bias. It's funny that this fuzz is currently my most tweaked fuzz circuit to date. Only a few parts but so much experimentation. Other fuzz circuits you get the schematic, the parts, breadboard and maybe test a few transistors, bias them and that's it. Along with the early Tone Benders and the Maestro Fuzz Tone which are more complex it's one of the toughest, considering its architecture.

Luckily, somebody at work who knows I am always on the lookout for metallic enclosures, gave me this great candy box. I couldn't have asked for a better design with those pink pigs on a round enclosure making it suitable for a Fuzz Face and for a Pink Floyd related sound, so I jigsawed it to the right height, called it Pink Face, mixed my glass paint bottles and came up with a magical pinkish tone... Perfect!

The sound is well worth the effort. It's not as warm or sweet as the Germanium version but it does give you the Time solo style. Bright when the FUZZ pot reaches max. The PRE-GAIN gets you that rolled off effect for cool rhythm chords and sparkly clean chops. Using a treble booster in front enables you to get great tones with the FUZZ knob below max. I also tested it with a Wah in front and no buffer was needed. Definitely a must build on my fuzz journey towards a better future.

If you want to learn more about the the topology of the fuzz face there is no better place than R.G. Keen's article: The Technology of the Fuzz Face. It helped me a lot in choosing the right part values and testing transistors both in my Germanium unit and this recent Silicon unit. It is really the Fuzz Face Bible, highly recommended and insightful. 


The schematic I drew up in Chrome Circuit Lab is shown here for reference but feel free to use it, tweak it or twist it. I will update it if I decide to change it. The feedback diode did not really do anything so I left it as in the Fulltone version.


Hope you get to enjoy it! You can also have a blast using Mark's vero layout on Tagboardeffects.blogspot,com

There is a lot of Fuzz Face info all over the web, here are some more recommended pages for extended reading on this matter:


Tuesday, October 30, 2012

Tumble and Drive - the Rougue Dumble


The Runoffgroove Tumble Drive (Umble)
For those of you who are following this blog and my recent posts, it is probably clear that, although our main point of concern is the magical sounds of fuzz circuits, a great of interest is being paid to the accompanying peripherals, which have a great deal to do with the overall guitar sound. What I mean by this long phrase is that every time I think I have understood the fuzz sound of a certain pedal I am amazed to discover how different it sounds and behaves when you play with it through different amps.
That was the main reason I began building amp emulation pedals like the English Channel (emulation a VOX AC30 top boost channel) or the Thor (The Marshall 100W Superlead). You have probably noticed that when it comes to amp emulation I am very fond of the Runoffgroove design, and that is mostly because they just sound great and they definitely evoke the characteristic sounds of the amps they aim to emulate.

On of the most sought after sound of guitar amplifiers is the unique sound of the Dumble amps which have been made since the 60's in California by Alexander "Howard" Dumble. Although I have never played through a Dumble in my life, nor do I believe I will ever do, it was interesting to hear what the fuss was all about. The list of Dumble users includes some major players like Santana, SRV, John Mayer, Al Di Meola and Ben Harper and many more. Probably the most recognized user of the Dumbles is Eric Johnson who made the amps famous with his singing Fuzz Face going through an heavily overdriven Dumble.

Unlike many of the ROG designs which I built in order to get the well known classic sound of a certain amp, on this build I just wanted a good American  sound which would get me from clean to crunch with some nice lead tone and good tone control. I even asked the ROG guys about a Fender like design that would get me close to a Vibroking or a Super-Sonic sound and they recommended their Dumble-like design, called the Umble, a cascaded FET based overdrive. 

I quickly started gathering parts and had the circuit running in a few days....and YES....another great sounding overdrive by the amazing guys at ROG. This is a very versatile unit which got me playing for days getting some wicked tones. On the lower end of the DRIVE knob it's capable of some really sweet clean tones. Single coils come cleaner but with proper use of the tonestack you can get Humbuckers to sound clean too. I really love low gain pedals because I love the warm drive you can get from them. This pedal does it all, warm, punchy or razor sharp, it's all there. Once you get the DRIVE up it becomes a monster and reaches Fuzz territory towards the end. While lowering the Tone stack knobs cleans the sound, increasing them gives you more drive and half way through the dials you are already speeding on the freeway.

I called it Tumble Drive because it sounded better then Umble to me and it drives so smooth and nice.
The one thing which I really love about this design is that it also serves as an excellent booster before a second overdrive like the Supreaux Duo ("1st Page" on my blog). It sounds really good and gives you the Eric Johnson tone if you put a Fuzz Face in front of it. Actually, every fuzz I hooked up with it sounded great and so it isn't just another amp-like pedal. Although the Tone stack is a little strange to work with it sounds good: The TREBLE knob adds some BASS as you crank it, and the BASS is quite subtle.

The final thing I did just recently was adding a simple switch to bypass the first FET gain stage so that I can now get even cleaner sound on low DRIVE settings. Now it's just perfect and I really like the paint job which I got in the end with the IGNITE toggle switch.
The gain switch which bypasses the first stage gain FET (in red)


Umble with Gain switch

Again....don't pass out on this design if you are serious about american sounding overdrives. The schematic can be found here.

Below are 2 demos of my lousy playing on my ES335 clone guitar and the pedal through a soundcard and some amp with room simulations. The first is a demo with different settings and the second is a mix of 3 tracks, Riff+rhythm+solo, with various settings showing the versatile sound of the effect on a single guitar. It's quite an amazing pedal with its capabilities as a low gain overdrive, high gain overdrive, full on distortion and a great fuzz character with the BASS knob fully cranked. The tone stack have a huge effect on the sound of the pedal.


Saturday, September 8, 2012

Shake, Rattle and Roll - The Runoffgroove Tri-Vibe vibrato/phaser/leslie pedal


As I have stated on some previous posts, getting the best fuzz sound or for that matter getting the best sound from any guitar involves more than a few parameters: Picking style, pickups, pedals, amps, mic placement etc. All this is nice and all but sometimes there are more effects involved which really transforms the sound into something else, richer, more psychedelic, more dynamic and new. I am talking about the use of filters, reverbs, phasers, vibrato, tremolo, delay and chorus effects. The first effect I built which was not a distortion pedal was a PAiA Voltage Controlled Filter. Combining the filter with a delay pedal proved to be a super exotic source of psychedelic sounds. I knew I would some day get deeper into modulation effects. As those effects are usually tougher to build I was always intimidated to start one out.

The Swirly Vibes vibrato/phaser/leslie pedal
When I started to get deeper into the Hendrix sound I found the Univibe pedal to be something of a mysterious part of his sound. It is used heavily on Band of Gypsys - Machine Gun, and on Izabella. Later I found out that Gilmour actually used a modified version of the Univibe as the phaser on the opening track Breathe on The Dark Side album (The phaser on the Shine On riff from Wish You was an actual MXR Phase 90). The Uni-vibe was first introduced somewhere in the 60's by Shin-Ei and Vox and was intended to be used as a Leslie simulation. When ROG came out with the Tri-Vibe: a simple enough design aiming to get that sound, I thought it was a good way to get into the business. Even more interesting was the design allowing to combine two modulations together, namely pitch vibrato and phase modulation to get the rotary speaker (Leslie) effect, hence, the Tri-Vibe. I always had a soft spot for Leslie cabinets used in Hammond organs but also on Pianos (Don't Pass Me By - the Beatles), electric guitars (as used by Jethro Tull on Benefit - Guitars, vocals and flutes) and even vocals (John Lennon on Tomorrow Never Knows).

A great page for some info about the Leslie cabinet can be found on:
http://www.theatreorgans.com/hammond/faq/mystery/mystery.html

The ROG design looked very clever and interesting so I built it and stuck it in a modified tin chocolate box. After a few gigs I realized that I needed a stronger enclosure so I reboxed in a regular 1590BB Hammond style box.

ROG Tri-Vibe new enclosure
The circuit has two self explanatory knobs for INTENSITY/DEPH and RATE, and a three position switch to get the SHAKE (vibrato) in the center position, RATTLE (phaser) and ROLL (rotary speaker). I love the rate knob which gives you a wide frequency range from about 0.2 Hz up to 7 Hz or so, that's a few seconds a round to a few rounds a second. Both vibrato and phaser are smooth and gentle and sound pretty damn good. Only drawback of the VIBE effect is that is is really mild and you can really feel it on the high RATE settings. I really wish it was more pronounced. The PHASER swirl effect is milder than the Phase 90 by MXR and it is actually very close to the EHX SMALL STONE which I really like. The Leslie-like whirly effect which is a combination of the VIBE and SWIRL is very good in itself but it only reminds me of the Leslie effect and it, obviously, doesn't have the crunch which accompanies a real Leslie. You can add the extra crunch yourself and get much closer to an actual Leslie sound. Using a fuzz (or better yet the High Tyme Axis/Octavia Fuzz) before the Tri-Vibe on Bass or guitar yielded such a dynamic and rich tone that made me sit one evening playing a single riff over and over dosing off on the guitar. Even the minimum settings on both knobs gives a nice useful hi-pass filtering. I also implemented the suggested mod which gives you the rate indication on the LED which is pretty cool and very useful.

I cannot speak highly enough of this pedal. I can just say that our band's guitarist and me always fight over who will use it on gigs. He actually calls me before each gig to make sure I don't forget to pack it. I guess I might have to build another one. I found a few amazing preset settings which I use very often (in clock numbers for RATE and DEPTH): 9, 3 on Swirl, 11, 1 on Whirl, 2, 2 on Vibe and so on.

The Swirly Vibes patterns
The Tri-vibe is not a Uni-vibe clone and those seeking a Uni-vibe could be disappointing as it doesn't employ the chorus mode which the Uni-vibe is famous for. However as it does have the vibrato mode and 2 swirly/whirly modes, it is a very good replacement and can actually be even more useful than the original. I, therefore, named it Swirly Vibes and painted the enclosure with patterns of waves, swirls and whirls which I really really like. It took me forever to decide on the graphics and after several attempts which failed I went with this great pattern which I got from a designers website.

I discarded the Shake, Rattle and Roll modes naming and just painted a wave a whirl and a swirl to designate the proper switch mode.

This fantastic ROG schematic and layout can be found here. Don't pass on this one. I used the Tri-Vibe name for a while with the old enclosure but after redesigning the enclosure from scratch and putting so much effort into the swirly waves patterns I decided to name it "Swirly Vibes". This is exactly what the pedal does best - swirly vibes.

Bellow are two audio clips demonstrating the Swirly Vibes pedal. One demonstrates the Tri-Vibe with a clean telecaster tone, and the second utilizes the High Tyme Octavia/Axis fuzz in front of the Tri-Vibe. I used all three presets with several settings on each. Just run through the audio clips to hear it's versatility.

The Mixcloud player is slightly less intuitive than the regular Soundcloud because you have to press - "UP NEXT" to get the playlist to show you the tracks, but it is equally well designed.