Check out his blog and his other related videos. Great job!
Friday, December 13, 2013
Fuzzquest shares Joe Gore's Fuzz detective video
Wow....I just have to share this video as this guy is on a true fuzz quest for 60s Germanium mayham. Take 12 pedals and play the same chain and same riffs, chords, whatever so that you can actually understand the different attitude of each one. I love the extra stuff he puts as what each fuzz was famous for and some of the famous riffs recorded with it.
Check out his blog and his other related videos. Great job!
Check out his blog and his other related videos. Great job!
Monday, December 9, 2013
Silicon Tone Bender mkII: Revisited
 |
| The Led Bender |
This is the first time I am revisiting a pedal and rebuilding it all over again. As you probably already know, the Tone Bender is one of the most elusive and tricky fuzz pedals around. The Germanium versions are hard to bias and you have to order specially selected transistors. This is not all that difficult once you understand how to measure hfe (gain) and leakage. Nevertheless, I have never built a true vintage Germanium Tone Bender and when I do, it will probably be a Prescription Electronics Yard Box or a true MK I version.
Anyway, I let the first Led Bender go and now it is happily crushing stages around the Zurich area with a really great band called Rivercash. I couldn't live without it so I had to build another one, and again, I tried starting out with the regular silicon versions which are running around the web. What can I say? another flop. No version sounded good and I couldn't understand why. The next thing I did was go back to the Hot Silicon version which sounded so well with my first Led Bender build. Voila...like magic. Wonderful buzz fuzz duzz muzz nuzz.
http://fuzzquest.blogspot.co.il/2012/11/bending-your-tone-for-page.html
I re-checked some of the biasing issues and ended up going closer to the Yard Box version with the 3.3k resistor attached to the Fuzz pot. All other biasing resistors seemed OK. Next, I changed the input capacitor on the FAT switch from 10uF to 100nF to get the Yard Box input cap. Transistors, as before Q1 and Q4 low gain 2N2369. Q2 2N3904 or some other medium gain tranny. Q3 BC108 or other medium gain tranny. I also tried 2N222A at Q3 and it was equally great. The tone knob was reversed so that cranking it would enable a fuller tone and CCW would make it thin and nasty.
The real magic with this pedal is on the lower settings of the Fuzz/Attack pot. Between 0 and 4 (on a 1 to 10 scale), the fuzz has some really great sounding crunch with the TONE knob crancked for full body. Lowering the guitar volume knob a little gives you some great unheard overdrives.
Here are some gut shots:


And about the artwork: I started with the Gold Glitter BB1590 from Mammoth and started painting using the same concept of the Zoso sign from Jimmy Page and added the other Zeppelin symbols around the sides, and of course, my ZUS logo which really complements the Page Zoso.


So, don't let this one go unbuilt. It's silicon, so it's guaranteed to deliver. And you know the best thing? When I hooked it up in front of a silicon Fuzz Face? AAAAmmmmaaazzziiing tone. You can really dial those Stoner Rock, Doom, Garage, Noise Grunge, Psychedelic Heavy Rock sound.
Probably one of my top 5 fuzz combinations!
Fuzz On.
Saturday, October 5, 2013
The Real Muff Pie
.jpg) |
| The Big Muff Pi clone |
If I had to choose 3 fuzz pedals to achieve the widest spectrum of fuzz sounds I would say that the 3 top pedals would be the Maestro Fuzz Tone, The Fuzz Face and the EHX Big Muff Pi (of course I could have chosen 3 other pedals if you asked me that question tomorrow morning). The Maestro Fuzz Tone is what you would call an early fuzz sound (1962-1966), similar in many ways to the early Tone Benders, raspy, buzzy, noisy and grainy like the Fuzzrite, Orpheum and the Super fuzz. The Fuzz Face is the legendary Hendrix or Gilmour fuzz sound (1967-1973), very fat, smooth and much heavier. However, when you take fuzz a step further (1971-2013) into metal, doom, grunge, acid blues and other heavy rock forms, there is one fuzz to rule them all. It's almost the end of the journey for you if you are after that kind of sound. After that you can maybe chain 2 fuzz pedals in a row, have boosters in front, make some mods to the design, but it doesn't really get any heavier than this (there are some attempts, though...).
The Big Muff Pi pedal is the holy grail of fuzz pedals for many rock guitarists. It's very much like the Tube Screamer in its legendary reputation. Both designs were pretty simple and became the source for numerous versions, clones, re-issues and variants. Both designs became cornerstones in rock history and made a huge impact on the development of rock and guitar sound. You could say that the Tube screamer is the overdrive in the same way that the Big Muff is the Fuzz pedal and it's what many people would describe as the sound of fuzz, without going into details too much.
The Big Muff designed by Bob Myer and Mike Matthews was originally based on the earlier designs of fuzz pedals heavily used by the late great Jimi James, a.k.a. Jimi Hendrix, and was first issued in NYC around 1969. The fuzz that roared out of this pedal was so thick, rich, creamy and heavy that once people started using it, there was no way back. The name Big Muff with the PIE sign is obviously a sex related name (see the 22/7 fuzz post on this blog), based on the association of the word muff pie (oh boy) with the words fuzz, fuzzy, fuzz face and the general habit of pedal designers to name pedals after sexist male associations (Ever heard of the Merkin fuzz?). The pedal retained sound consistency due to the use of Silicon transistors and the use of 4 of them meant you had a buffer pre gain stage, a dual gain stage similar to older designs and an active tone control. Luxurious design! throughout the history of this pedal, various transistors and a lot of the passive parts values changed. Sometimes for getting different sound, but mostly due to changes in the parts inventory of the factory at the time. This resulted in a huge amount of variants. The most famous versions became the Triangle (for the arrangement of the knobs) which is the original design with its silver enclosure, the Ram's Head version which had slightly different values and transistors, the Green Russian made in Russia during the mid-90s with its famous khaki army-like enclosure and the 1977 V4 design with its red and black graphics which became the most famous graphical design for the big muffs re-issues.
Below are two images of typical BMP versions from various eras:
 |
| The USA designs from the late 60s through the 70s and the re-issues of the 90s and the 21st century |
 |
| The Russian designs from the 90s |
It would be redundant to go deep into the history and circuit design of this beast of a pedal as there is so much info on the web already. Just take a look at:
or
a quick version review can be found on:
On these pages you can find anything from the transistors used on each design, the schematic nuances, the enclosure changes and the artistic graphic designs. Who played what is also probably very interesting for many people. Hendrix used the original version during in his late career, Gilmour started using Big muffs around 1975-1976 and later on. He used the original Triangle version and the Violet and Ram's Head version from the early 70s .Billy Corgan and his Pumpkins used a 1978 op-amp version from 1978 in the Siamese Dream album. 8 tracks of muffed guitars at once all through a Marshall JCM800 with a Strat or a Les Paul. "Huge Huge Sound" was what Billy called it. After the album came out the price of a BMP pedal sky rocketed from 40 bucks to 200 bucks!!! What a comeback. J. Mascis of Dinosaur Jr. and Witch used a lot of early BMP versions throughout his career. He likes to put two in a row for super thunderous muff sound. Jack White of the White Stripes has used the BMP quite extensively although he is also known for using a lot of early fuzz pedals as well.
A huge list of BMP users can be found on:
http://www.kitrae.net/music/big_muff_users.html
http://www.kitrae.net/music/big_muff_users.html
The list includes so many names it's hard to count but just to name a few: Robert Fripp (Guild Foxey Lady 1972-1974), Steve Howe of Yes (Triangle), Thurston Moore and Lee Renaldo of Sonic Youth (Sovtek "Civil War"), Kurt Cobain of Nirvana, John Frusciante of Red Hot Chilli Peppers, The Edge of U2, Pete Townshend of The Who, Dan Aurbach of the Black Keys, Kevin Shields of My Bloody Valentine, Jamie Cook of Arctic Monkeys, Cliff Burton of Metallica, Ace Frehley of Kiss, Jeff Pinkus and Paul Leary of the Butthole Surfers, Stephen Malkmus of Pavement and many many others.
 |
| The ZUS Pi |
Build any of the versions as shown below:
or:
or:
What a huge selection of schematics, hu? Triangle or Ram's Head if you want vintage style. op-amp if you want the Smashing Pumpkins sound, Civil War or Green Russian for that grungy alternative rock sound. This is a monster fuzz any way you build it. Stack two in a row or one with an overdrive behind it or a fuzz face style pedal in front of it and you can get all sorts of fuzz bliss.
Here are some noises I made with my version:
Friday, September 20, 2013
Ginger Bread Bass. Hot from the oven

 |
| The original 1965-1971 Ampeg SB-12 Portaflex. A 12" recording work horse. |
The Project itself was not difficult and the noise was not enough to go and replace the trimmers with fixed resistors once you bias the 2N5457 Q1 and Q2. In fact, I always socket my trannies so that I can replace them or test a few before settling down. I did have to troubleshoot a bit. On the first attempt to bias Q1 I realized that the trimmer does not change the drain voltage at all. I found out the circuit ground was not connected. What a shame. Then I saw it still didn't work after I connected the ground. Found out another connection was not properly soldered or was it a cold soldering case? I don't know but once the little troubleshooting was done I was in bass heaven for about an hour until I realized it was 2 in the morning.
This build certainly got me going berserk on my bass all over again and that's what I like about it. I don't have a fender P-bass or a J-bass but I am convinced that this pedal sounds even better on fender basses than it does on my Music-Man style bass.
The schematic, and pref-board layout which I love so much from Runoffgroove can be found here. It's too bad the guys over there at Runoffgroove have stopped publishing layouts. I really dig their designs and so does anyone I know. I just might print a T-shirt with a "holler" to bring them back to earth.


Saturday, July 27, 2013
Thy Last Screamer
.JPG) |
| Landgraff's Tube Screamer Clone |
The schematic basically revolves around the operational amplifier which is hooked up with a diode clipping pair on the negative feedback loop. This is the overdrive section which is very common to all Tube Screamer offsprings. When the diodes go into clipping due to a drop in the forward voltage on the diodes, you get a saturated clipping tone. This is what happens when you crank the DRIVE knob. It increases the gain on a resistor hooked up in parallel to the clipping diodes and thus more juice is fed through to clipping. Various designs of clipping pairs can be used like 1N914 or LED pairs. Clipping can be symmetrical or asymmetrical. It means that if you run a sine waveform through the gain stage you get a distorted waveform which looks more like a rectangular shape. There is also a clever chain of filters designed to get rid of some bass before clipping occurs and then stage.
Below you can find a schematic of the two stages: The clipping stage with its high-pass filter in front, and the post clipping EQ'ing.

| The clipping stage with its high-pass filter in front, and the post clipping EQ'ing with its lo-pass and hi-pass shelving filter. |
The filter design is what makes the Tube Screamer cut so well through the mix and it always sound punchy. it's very mid range in terms of equalization. Also the original TS and most of its variants employ an input and output buffers. So, to sum things up the Tube Screamer overdrive style is a very sweet and warm one with plenty of mid-range not a lot of body. The complexity and success of its design made it possible to get a lot of different colors by implementing small changes to the circuit. A lot about the magic within the electronics can be learned from the links below:
Among the endless list of clones and variants you can find: BOSS OD-1, MJM Phantom Overdrive, Landgraff Dynamic Overdive, Green Machine, Little Green Wonder, MAXON 808, Retro Sonic eight o eight, Signa Drive, Maxon OD820, HBE Power Screamer, Toadworks Texas Flood, Visual Sounds Route 66, Xacttone Multi Drive, SBN Lil Screaming Eagle, Pedalworx Tejas, Lovepedal Burst Eternity, Cusack Screamer, Way Huge Green Rhino, Clay Jones OD, Fulltone Fulldrive 2, Love Pedal OD11 and many others, all categorized under the tedious label YATS (Yet Another Tube Screamer).
.JPG "Scream-A-Delic Overdrive") |
| Scream-a-delic Dynamic Overdrive |
I built the layout using the JRC4558D op-amp and a pair of 2SC1815 trannies for the buffers. A really nice addition by Landgraff is the clipping switch which let's you choose between symmetric LED clipping, asymmetric diode clipping (1N914) and no clipping at all which makes the unit act as a nice mid range booster. I didn't use any ready made layout and just built the entire thing according to the schematic from beginning to end. Got it right the first time...
If you want to imagine the sound of the screamer think of the SRV blues tone and the sweet Gibson sound of R.E.M. or Oasis. That's the sound. Being such a big psychedelia addict I named it "SCREAM-A-DELIC" to stay in context with the original Screamer but to give it some nice Scottish Primal Scream vibe (and yes, I noticed that I miss spelled the "Scream"...ooops).
Until I get my audio clip together, here's a review from the best in the business - the Gearmanndude. He's got a few of those videos featuring the LDO amd it's a killer pedal, even next to some boutique legends like the Zendrive and the original screamers.
Don't think twice. Built the LDO or another YATS, and yeah, it is that good! You can find the Clay Jones schematic with a nice layout here or here.
Thursday, May 23, 2013
A Nu Tone clone for the old Mu-Tron III
 |
| The Mu-Tron III clone - NU-TONE III |
For a very long time I have been interested, mainly, in pedals which gave me sweet fuzz and overdrive crunchy sounds. This is because I use them. It seems pointless to build too many pedals if you don't use them. I did build the wonderful ROG (Runoffgroove) Tri-Vibe and loved it, I did buy reverb and delay pedals and I use them all the time. However, I am always ready to dive into a new sonic adventure if given the proper incentive. Well this time I was approached by a guy who runs a gig-rehearsal room-bar kinda place and he saw our band's pedal arsenal and asked me to build him a pedal which is called Mu-tron III by Musitronics.
 |
| Stevie and the Original 1972 Mu-Tron III |
When I researched it I was super thrilled by the challenge and told him I would make him one. I didn't have a clue where to begin but after a few hours which became days I understood what this legendary pedal was all about and I found the schematics, layouts, manuals and most important a ready-to-solder PCB from JD Sleep at GeneralGuitarGadgets which I love so much.
The next issue was locating all the parts with 2 key components which I didn't find, the opto-isolators. There were a few options how to go that path and I chose to listen to Steve Daniels at SmallBear who recommended the H11F3 Photocouplers which were supposed to be similar to the Original Hamamatsu ones. Other options seemed less appealing to me and sure didn't want to go into building my own couplers with a LED and an LDR hooked up together.
From reading about the circuit design it was also obvious that tuning the unit's frequency response with a single resistor would make the unit less versatile and I decided to add a 10k pot instead. This pot gave me an extra frequency sweep control which made the filter pedal even more versatile and playing with it was like a manual frequency knob on an analog synth filter. Great Fun, check out this audio clip below:The next issue was locating all the parts with 2 key components which I didn't find, the opto-isolators. There were a few options how to go that path and I chose to listen to Steve Daniels at SmallBear who recommended the H11F3 Photocouplers which were supposed to be similar to the Original Hamamatsu ones. Other options seemed less appealing to me and sure didn't want to go into building my own couplers with a LED and an LDR hooked up together.
Anyway, while building this incredible pedal as an order to a friend who plays bass, I knew I had to have another one for myself. So...I built a second one.
 |
| The GGG PCB all populated and ready for wiring up |
 |
| Experimenting with the unit prior to the artwork |
 |
| Planning the Artwork |
 |
| The finished Mu-tron clone unit - Nu-Tone III |
If you get the PCB you can do it without to much trouble. It would be braver to go at it without a ready-to-solder PCB. Also don't pass on the 9-18V charge pump option, it's a must. One think I am not to certain of was the bypass switch which is accomplished using a FET instead of a normal true bypass configuration. It works, nevertheless.
There are so many settings with this baby and so many options that it blows me away. Subtle or hard, LP, HP, UP and DOWN, it's really the Endless Enigma (if you know what I mean...ELP...), I just wish I would play more music that demands this kind of sound. I usually use it nowadays on bass more but for a Clavinet or a Rhodes style electric piano it would be a killer.
GGG have all the necessary technical info right here. It's off the beaten fuzz track but certainly a worthwhile addition to your fuzz tone arsenal of eccentricities.
Friday, April 26, 2013
So ya thought ya might like to...be a DIY dude?
 |
| Basic DIY parts - Boards, resistors, capacitors, semiconductors and wires |
Today I figured I'd do something a little different. Instead of bragging about another Fuzz I built and sharing my thoughts, I thought it would be a good point to stop for a minute and share some of the DIYer's daily routine.
I've been an electronics geek since I was 9 and by the age of 11 I already had more than a few solder iron burns on my hand. I built mostly DIY kits and I was happy. around the age of 20 I started getting into electronic music and musical gadgets. Over the years I've built PAiA kits which came out excellent and have proven to be very useful and great sounding musical tools. It was only 3 years ago or so that I started really getting into guitar DIY pedals and amps. It all started with the Ruby amp by ROG and the Noisy Cricket from Beavis Audio. The amount of blogs, websites, tutorials and general info I found was so overwhelming that there was really no way back. At the time, I had a few commercial pedals like the TubeWorks Real Tube Overdrive, the VOX 847 Wah pedal and the fantastic Ibanez DD7 delay (which was the best birthday present I got from my wife after it was stolen during a gig). After a few fuzz and overdrive pedals I knew I would never buy another commercial grit pedal and the quest for the perfect fuzz circuit began. One thing I must admit is that I always wanted to build a spring reverb effect and have yet to achieve that. I did get myself this year (birthday again) the TC Hall of Fame reverb pedal which is an excellent addition to my ever growing rig.
So let's get down to business....If you're a noobe, a rookie, or just a dude who is trying to make a pedal in the real world, here's a short review of what you will need, and what you will need to know to get the job done. I wouldn't call myself a super experienced veteran, but I did build about 40 pedals and other audio gadgets over the past years and I made a hell of a progress over this period.
My 10 commandments for the DIY beginner:
- You don't need to be an electronic engineer to build a pedal, but you can't built anything right without having some basic understanding of electronics. You need to know what a resistor is what are capacitors, diodes, transistors, voltage, current, inputs, outputs, switches and potentiometers. All the rest can wait.
- You have to have soldering skills. Get a solder iron (or gun), watch some tutorials on YouTube and practice a little. It's not rocket science.
- Listen, learn, read-on....there are so many great websites with helpful information, use it! some of the best out there are:
- http://www.beavisaudio.com/
- http://www.runoffgroove.com/
- http://www.muzique.com/
- http://www.aronnelson.com/gallery/main.php
- https://www.generalguitargadgets.com/
- http://fuzzcentral.ssguitar.com/index.php
- http://www.geofex.com/
- http://www.tonepad.com/
- http://www.sabrotone.com/
- http://circuitworkshop.com/forum/index.php
- http://www.stompthatbox.com/byo.html
- http://www.turretboard.org/
- http://www.freestompboxes.org/
- http://www.diystompboxes.com/smfforum/index.php
- and the list goes on....
- Decide what do you want to build, what sound do you want to achieve, don't build something you don't need. You don't want to spend money and time on something that you don't need or don't like. Listen to demos and watch videos of the pedals you are going to build. Almost any pedal you can think of has demo clips on the web. The gearmanndude YouTube channel has an incredible amount of pedal demos, so does Proguitarshop. Want some fantastic blogs except this one?
- tagboardeffects.blogspot.com
- revolutiondeux.blogspot.com
- apocalypseaudio.blogspot.com
- there are so many others too...
- Get all the information you need off the web BEFORE you buy any parts and BEFORE you do any soldering. Make sure you have the right schematic and a verified layout, compare versions and make a list of ALL the parts you need. It's really annoying finding out you need one more 2N5457 and having to wait for it to arrive by mail with your circuit sitting around almost finished. Great sites for buying parts:
- https://www.smallbearelec.com/home.html
- http://www.mammothelectronics.com/
- http://www.fuzzboxworld.com/
- http://www.effectsconnection.com/
- and of course....http://www.ebay.com/ has a lot of great stores.
- Get yourself a breadboard and make sure you are gonna build something that really works.
- It's harder to debug a non-working circuit than to build a new one. When you build your circuit make sure you are doing it right. Check and double check and triple check each point and don't move forward until you are sure you are OK. Go slowly and patiently. It will save you time.
- Nevertheless, there is always some probability for bugs. Bad parts, bad soldering, wrong schematics or just plain human mistakes. Don't loose it and be patient. Never give up on a circuit.
- Get yourself a simple digital multimeter and build an audio probe. The multimeter can test part values like resistance and capacitance but it is a super important tool for measuring contacts and voltage values. About the audio probe, we'll get to that later, but it's really something which helped me troubleshoot a few circuits. Any help you can get from articles by guys like R.G. Keen, Jack Orman, Doug Hammond, Runoffgroove and Mark Hammer can be extremely useful, but sometimes they for more experienced DIYers. I built my audio probe according to the dubugging article:
- Last but not least..... Aesthetics is really something you should try to improve over time. It is great to buy good enclosures and to choose nice knobs, but what I really mean is keep your wiring neat and tidy. Shorter wires, better layouts, better enclosure and off-board wiring will make your pedal look better, and more important, it reduces noise, hum and can make your pedal sound better in the end result.
 |
| Solder gun, wire cutter, needle nose pliers and some solder wire. |
The audio clips on the Runoffgroove website or their older site home-wrecker are a great place to begin.
They give you everything from the clip and review to the schematic and the layout with a part list. The amount of schematics and layouts on the web is enormous and confusing. The websites I refer to on the lists above a great selection of verified schematics and layouts.
It is always recommended to start with a simple layout. Fuzz and booster pedals are a good place to start. It's good to order more parts than necessary for a specific pedal, over time you will see that you have many parts and can build a circuit from parts you have without having to order anything. For pedals which I wasn't sure about, like germanium fuzzes where the parts need tweaking, I found it very useful to get a breadboard and build a modular setup where I could use the breadboarded layout as a pedal with a switch and jacks so that I could really play with it and tweak it on the board.
 |
| A breadboard setup with a bypass switch and i/o sockets |
 |
| Off board wiring parts...the enclosure is missing |
- 3PDT stomp switch
- Enclosure (preferably metal)
- Input and output sockets
- 9V DC socket and/or a battery clip
- Knobs
- LED with a resistor
- LED bezel
- Stranded wire
Another thing that I found myself bashing my head about was 'what's the best true bypass switching layout?'
I found many layouts on the web and having tried more than a few I can safely say that I have found the right one for me. The layout below has true bypass switching with LED, DC 9V input with batter clip option. It also has input to ground connection when the pedal is bypassed. There are other options but this is what Analog mike of Analogguru and Zachary of ZVex are using. That's a very safe and sound layout.
 |
| My best stompbox True Bypass wiring scheme |
 |
| An Audio Probe tester |
 |
| Drill protection with masking tape |
 |
| The perfect enclosure |
I started covering the enclosure with masking tape and did all the pencil measurements and drilling with the tape protection on. Once you are done drilling and cleaning, you take the tape off and the enclosure remains intact.
 |
| Trying to fit everything |
 |
| The finished product |
So...that's it. Now that everything is working and you have chosen the right colors and played a bit with your pedal and you think you got yourself a keeper, you can commit to the artwork. After you paint the pedal there is no turning back, you won't be able to repaint it for another circuit (Unless you just paint VOL, TONE, GAIN).
For some time I've been looking for perfect colors to paint my enclosures, something which could be strong, opaque and comfortable for doing delicate brush work. What I have come up with is a set of window glass and ceramic paint. Lefranc & Bourgeois have some great ceramic paint, but the black color I found best was GlasArt used for vitrage painting. It says transparent but it is perfectly opaque for pedal painting. Buy a set of black, white, red, blue and yellow (maybe green too) and you can play around with a color palette to create some amazing tones. It is so much fun, if you enjoy creating new tones using various pedals for your guitar, you'll love painting. All the examples on this blog were done using these exact colors with Pure Sable brushes of various sizes. Acetone can be used to clean the brushes and to correct mistakes, but be very careful!!! Acetone can damage the gloss of the die cast coating so don't over do it.

Now go out and start working...be patient...put some thought to it and don't give up if the first one doesn't come out as good as you through it would.
In the end, it's the love you put into those pedals that gives you that satisfaction when you play your guitar and you know that sound is really yours.
One last warning before I wrap this post up....if you are a guitarist or any sort of musician, don't get caught in the pedal making business to much. It's better to burn out than to fade away....ha ha ....what I mean is - It's always better to play than solder.
Rock On...crew members
Thursday, April 11, 2013
Fuzz Testosteron
 |
| The Mastotron Clone. Even the LED is pink |
Well, here's a quick one. I was asked by a friend to build a Mastotron Fuzz clone which would be just like the real ZVEX but in a PINK enclosure. The main specification he was after was ultra bassy fuzziness. Reading a little about this beast I thought this would be a good choice.
The schematic and layout seemed like a modified fuzz face with some added controls. He also wanted to do the artwork so I thought why not.
I ordered the parts and got straight away to work. I really got more and more into vero boards lately so I gave it a go and made a vero layout from the tagboardeffects blog using a regular prefboard and using the leads of the parts as connecting lines to emulate the vero board layout. I really like this idea.
This pedal is not a legendary one nor do I know of anyone who used it in the history pages of rock...but this thing can really roar. Actually I've never heard such a great bass fuzz before. This thing is the perfect fuzz for stoner rock and doom metal guitarists who need their sound to explode with fireworks. It has the square wave character of muffs and faces but it has this extra grit that makes you go 'uhhhh'. The controls have PUSH/RELAX (just a Pregain), FUZZ (of course), PW (pulse width, a.k.a. smoothness), TONE (very effective) and VOLUME (actually not a loud pedal even fully CW).
 |
| knobs, from the left: VOLUME TONE PW FUZZ PUSH/RELAX |
I went to give the guy his pedal down at an underground bar where he played with his band and they hooked up the pedal right there in the middle of the song, like they were waiting for it. The pedal sounded great right away (except for having a bit of a low volume).
I used 2N3904 silicon transistors which are supposed to be great, but if he asks for more volume I might switch to higher gain ones or just add a booster stage before the volume knob.
Again, I don't know too much about this one but it's not for everyone. It's not a muff or a face, it's really something else, which is very typical of the ZVEX line of pedals. He is always tinkering to get more options and a wider palette of sounds from his designs.
Definitely a worthwhile design for fans of Witchcraft, Witch, Windhand, Cosmolux, Hellbender, Blowback and other Stoner/Doom rock bands. Did I say that I even had the LED ordered in pink?
Here is the layout and the ZVEX description of the pedal.
I did a demo using guitar and bass for this one:
Saturday, March 9, 2013
A Palette of Tweeds - ROG's Azabache

Well, I'm really excited about posting today because I think one of my missions throughout this quest is over. A large part of my FuzzQuest has been devoted not to fuzz pedals but to amps or amp pedals which complement fuzz pedals. Over the past few years I have built the Thor (Marshall emulation), The English Channel (Vox) and the Professor Tweed (Fender), all Runoffgroove designs. I built other amp-pedals but I consider Vox, Marshall and Fender to be the most defining amps in fuzz history. Anyway they are all good pedals but there was something about the Tweed pedal which didn't sound right to me. It was good but I didn't get that Neil Young sound or Keith Richards sound which I really love. It was a good pedal for a fuzz kicking it, but as an overdrive it wasn't that rewarding.
So I started looking for more schematics and found that Wampler, BJFE and Catalinbread had some wicked stuff and I really wanted to give one of them a go. Just as I set out to, Runoffgroove came out with a very interesting design of a new Fender-like design which sounded good on paper. They called it Azabache. Surprising enough I also found a really nice guy who sent me the PCB for 10$ so I got the parts I needed and started to work. Usually I like building my own prefboards or tagboards but this time I thought "why not?"
 |
| The Azabache populated PCB |
 |
| The drilled enclosure almost ready |
 |
| All sitting nice and comfy |
 |
| Ready for lock down |
 |
| I love this combination of colors |
I have played around with this pedal both in rehearsals and on stage and it always kicks ass. It is so versatile that it can go from muddy bluesy 50's style tweed to bright Black or Silver face country clean style. It's got warm overdrive that is to die for and with my telecaster it's just unbeatable. the SCOOP and BRIGHT switches are subtle but they do exactly as described and mixing with them on top of the TONE and GAIN knobs produce an endless amount of tones. I was so impressed by the range of colors it had that I named it Tweed Palette. Took me a while to decide on that name but...there it is.
This thing was not a kit. I just ordered the PCB and all the parts besides that were ordered separately. Just because someone asked I am mentioning this again:Q1 was 2N5457, Q2-4 were J201 and Q5 was 2N5088.
A mod from the RUnoffgroove team on DIY Stompboxes for reducing the trebleness of the pedal: Substitute the 47K resistor going to TONE 1 for a link (or a smaller value resistor).
I did some playing around with a tele and a cabinet simulator and sent it over the ROG guys with many thanks:
Now you probably want to know how it sounds with a fuzz. Well, with a silicon fuzz face like my Pink Face it sounds the best. Instant 60's fuzz. Did I say that half of my quest is over?
Anyway here is the ROG Azabache project and schematics. I would love to know how it stands next to the Catalinbread Formula No.5.
Saturday, January 19, 2013
Don't stomp me now - The Mojo Stomp porch box
.JPG) |
| The Mojo Stomp |
Somewhat off the main path or my FuzzQuest, here's something a bit different. The never ending quest for a perfect fuzz tone is not my only goal in terms of tone and guitar sound. Another fetish of mine is Blues, and by Blues I mean hard, painful and soulful Blues with its roots somewhere around Mississippi delta. I love both acoustic and electric blues and as much harmonica as possible with a lot of howlin'. From Mississippi Fred McDowell, Blind Lemon Jefferson to Howlin' Wolf, Little Walter, John Lee Hooker and Muddy Waters. Even the "new" guys like Charlie Musselwhite, R.L. Burnside and Junior Kimbrough are fantastic and deliver super guts-out blues. When I play solo guitar with harmonica and I wail my soul out I always find myself stomping my foot hard against the floor, and most often I pray it was a wooden porch floor. Most of the time it's not.
So, I started searching the web for every possible porch-box-stomp-box solution and came up with a huge amount of material to work with. A lot of people around the word will sell you a wooden box with a Piezo transducer and some jiggling metals inside to get a nice foot stomping sound. Some of the nicest sounds I've hear, however, came from boxes where a small speaker was placed as the transducer to pickup the mechanical vibrations of the stomp.
I found a really nice 2-way Sony speaker and a good wooden box (old optical equipment was traditionally sold in very good wooden boxes). The woofer had a good low bottom while the twitter had nice punch, so I decided to use both of them placing the two speakers in the box. I cut a big hole so the the box would close and the Alnico magnet of the woofer would stick out of the box and I covered it with some more wood and rubber. I hooked up the two speakers in parallel and took the two lines and connected them to a mono Neutrik 1/4" input jack and that was it.
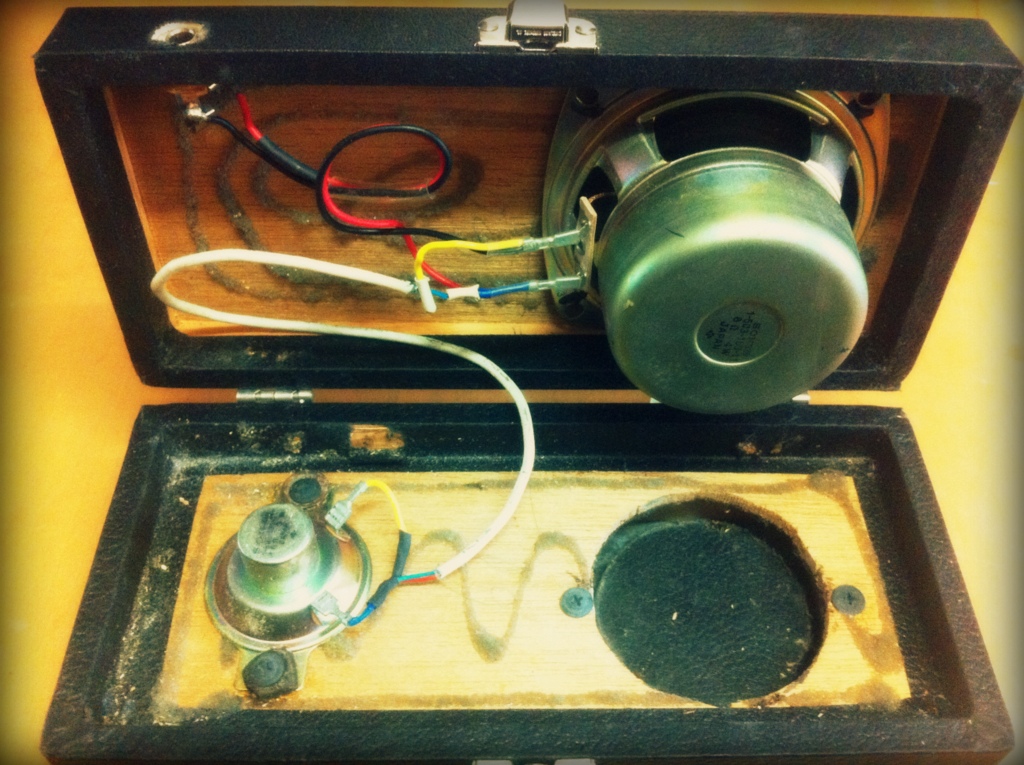 |
| The Mojo Stomp - gut shot - two speakers, one jack, one box |
There are so many ways you can use this box. playing with your foot or hands, stomping, tapping or knocking. Different areas on the board give you various tones, closer to the woofer you get more bass, closer to the twitter you get more treble and edge. All this makes this box a nice electro-acoustic bass drum. The added value here comes from the fact that you can turn the box upside down and get even more tonal options because now you're hitting the speaker membranes from the opposite side. One last gimmick is the tilted position of the box due to the magnet's size, sticking out of the box. This means you can put your foot on the pedal and do a "wah-wah" kind of movement and get two bass-snare sounds, one from your heel knocking the bottom end against the floor and one from your foot tapping the upper side of the box.
Very dynamic and playable !
 |
| The Mojo Stomp - the tilted position |
Some well respected stompbox manufacturers are Mojohound, Pratley, Ellis, musiXtools, TinoStomp and Peterman.
Stomp away and howl....if you want audio or video clips, just comment and I'll abide.
Subscribe to:
Posts (Atom)